Ever since I bought my Wacom tablet, I’ve been working pretty exclusively in a digital environment. It really makes a lot of things easier for me. But back before my tablet, I would hand-draw the lines for an image and only add the colors on the computer. I know lots of artists prefer to work that way and I’d like to share a couple of tricks I know to get better results from that process.
First off, you need to scan the drawing to get it into digital format. I always scan this sort of image in greyscale at 300 resolution. If you’re going to print the image, 300 dpi is the very minimum you want to work with. It doesn’t hurt to make it even higher.
Let’s start with a challenge. Let’s say that the image is too large to fit on your scanner’s bed. As long as you have Photoshop, that’s not a problem. You can use the photomerge feature. I’m on Photoshop CS5, but Photoshop Elements also has it.
Scan in the two halves (or four corners) of the image so that they overlap at least some at the edges. Save all the files somewhere you can get to and open them in Photoshop.
Then go to File->Automate->Photomerge. Since they’re already opened, just click the button for Add Open Files. Alternatively, you could also select the image files from your folders. Choose the Auto radio button, if it’s not already selected. Click OK.
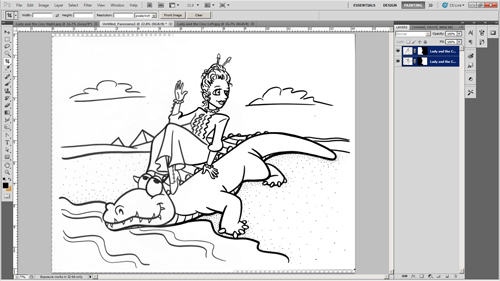
Once it’s finished, merge all layers and you can close the original files.
Save this merged image file before continuing.
Make sure the image mode is RGB color, then clean up your lines. Adjust the levels so that the lines are pure black and the page is pure white. Or, that’s assuming you want your blacks to be pure black. If it’s more of a pencil sketch, you might want them to be 50% or 75% black. Whatever. Regardless, the white needs to be 100% white. Don’t go overboard adjusting the levels, though. You don’t want to make the edges of the lines too pixelated. You want to preserve those smooth shades of grey on the edges of the lines.
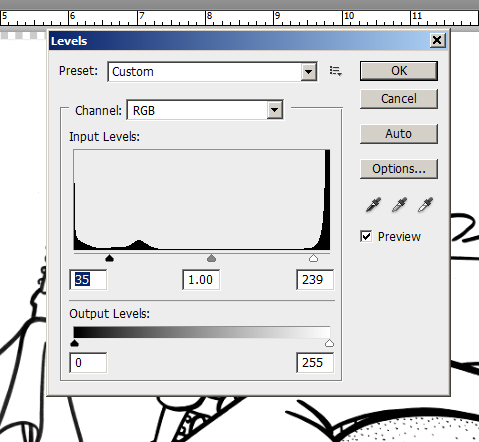
Erase any smudges, stray lines, etc. that you don’t want in the final picture. You won’t be able to easily adjust the contrast later, so make sure to get the lines as you want them now
As always, remember to save often.
Now it’s time to use the most useful free plug-in there is for an illustrator working with line drawings: Mike and Yael’s Kill White. First off, make sure that you’re not working on the background layer. If you’re not sure, double-click on the layer to convert it to a regular layer rather than a background layer. Open up the Kill White filter and run it.
Edit: This is a pretty old post.
I’ve since learned a better way to remove all the white from a layer using the Channels tool. It works just as well, but without having to open PixelBender and run an add-on filter. I talk about that here. But the Kill White filter will also work. There are other techniques that work also.
I also now know that you can make the white invisible by just changing the blend mode to “Darken”. (“Multiply”, “Color Burn”, and “Linear Burn” have similar effects that will also make white invisible and which you might find useful.) Changing the blend mode is probably the easiest thing to do. However, there are sometimes reasons you might want the white actually removed rather than merely invisible. I usually pull the white completely out, even if I don’t strictly need to. I figure, why keep it if you don’t need it? Occasionally it can interfere with filters or the selection tool or something. So, I just get rid of it if I don’t need it.
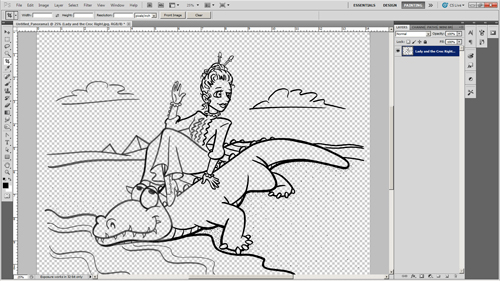
Now you have a layer with all the white converted to a transparency.
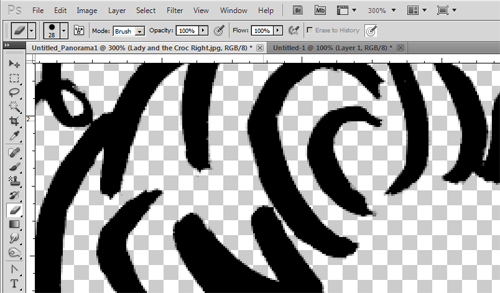
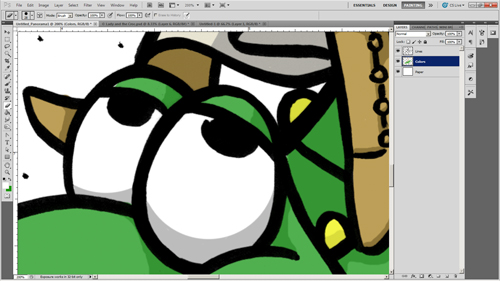
Notice that it converted it cleanly? There are no white edges around the lines. The filter will actually convert a 50% grey pixel to a pure black pixel that’s 50% transparent. Same thing with colors. That means no ugly white edges. I’ve blown the image up to 300% below to show that.
Now you have your line layer. Create a new layer, fill it with white and position it underneath your line layer. Think of this as your paper layer. Create another layer and position it between your line layer and your paper layer. This is your color layer. Paint your colors here and they’ll be underneath the lines, but on top of the paper. For further flexibility, you can create a new color layer for each individual color you use. That way you can easily isolate each color and adjust it separately as necessary as you work.
Here’s another close-up. See? No White edges.
 And there you go. That’s how I color a line drawing with Photoshop. I hope this makes someone’s life easier.
Post Edited Nov. 4, 2012: Minor text changes and images added for Illustration Friday’s reblog.



Saved! Thanks Karen.
This filter is wonderful because it lets you automatically and perfectly clip out all that white around your lines. And you don’t lose those pixels that aren’t perfectly black or perfectly white. Those just end up partly transparent. An immensely useful plug-in that everyone should have.
I will have to see if the old PS version i have will let me do it, but I won’t upgrade til I can upgrade the computer itself! Hence ‘saved’!
Photoshop 6? If you can find Mac’s Remove White, that’s the equivalent for Photoshop 6. Only, Photoshop 6 is so old, sometimes it’s really hard to find the filters for it. I was actually looking for it the other day for someone, but couldn’t find it. I did find references to it, but all with broken links. I didn’t spend much time searching though. If you can find it, it’ll be well worth the time you spent on the search.
Thanks for the extra tips!
No problem. I love being a know-it-all. 🙂
I appreciate knowing someone like you!
Aww… gee…. 😉
Wow, I usually, treshold it and then colour pick the black and cut and paste it on a new layer…but treshold doesn’t work on sketchy drawings ….TFS
Kill White works better. 😉
It’s kind of a pain in the butt to figure out how to install it. (Or maybe I’m just dense.) I have had to do it several times after getting a new computer or having to reinstall an operating system and I always install it wrong before I get it in the right place. But it is SO worth the trouble once it’s on. It is my #1, must-have filter. The one I use is the 64-bit one that requires Pixel Bender. Follow the link in the post and you’ll see what I’m talking about. 🙂
You should definitely try it. It is tremendously useful. 🙂
I’ve downloaded it…haven’t got time to get around it yet …
According to the guy’s blog, he’s working on a related filter called kill color, which should be interesting when it’s done.
This was so so helpful. Thank you! Have downloaded the plugin and will start to try and install it in a bit.
You’re welcome. It can be kinda a pain to figure out how to get it installed correctly, but once it is, it’s well worth the effort. Good luck!
grumble…i’m on a Mac. Hopefully I can find something compatible…
Hmmm… Sorry. I don’t know if it or something equivalent is available for the Mac. I hope it is. Good luck!
It is sort of compatible… No native plugin because I don’t have a mac (I come from gaming). The Pixel Bender toolkit is cross platform, if you can install that you can use the filter. Unfortunately they killed it off so it can only work on CS4 and CS5 on mac. CS5 is somewhat a problem too.
I’m not sure adobe has any idea how to support developers to work in their products as they keep changing how it works and killing great features.
Future projects will in one way or another have better cross platform support. It might wind up being a web browser or a stand alone program, but it’ll work.
(Since this is purely a hobby I don’t have a time line. )
Even though the UI design is horrifying, Gimp does have a similar feature and will run on almost any OS.
http://docs.gimp.org/en/plug-in-colortoalpha.html
Thanks for the information, Mike!
Guys, that’s the Mike that wrote the filter.
Thanks Mike! I’m still hunting around-and unfortunately I’m on CS3!
Mike, you need to put up a donate link on your website. I’d throw you thirty bucks or so. This filter is really useful and it only seems right to pay you something for using it.
Thank you for sharing!
You’re welcome. I hope it’s useful for you. 🙂
Great tutorial! Thanks for sharing. My process is to simply to set the layer blend mode to ‘multiply’ which effectively makes any area that is white transparent. What would you say the advantages are to using this plugin to knock out the white areas over using the ‘multiply’ blend mode?
Well, if you know you’re never going to want the white background ever again, there’s no reason to keep it. It’s one more thing that must have special settings for it to look right. It’s just sometimes easier to really get rid of the white rather than always having a special blend mode to filter it out. Especially on a complex image with lots of layers, many of which with their own special layer settings. It’s just one less thing to mess with.
It’s mostly just preference, really.
Oh, and I wouldn’t recommend using the plug-in anymore. I’d use the trick with the Channels tool instead. (There’s a edit note in the middle of the article telling about that.) It’s too much bother fiddling with getting the plug-in installed properly if you can just use an existing feature to do the same thing.
Thank you so very much for doing this. Lots of helpful tips !!
You’re welcome!
Reblogged this on Leila's Imaginarium and commented:
I’ve just come across this Tutorial. Quite a nice and detailled way to process hand drawn images and color them on a computer. Thanks Karen B. Jones
Reblogged this on afishinthehat and commented:
simple but really worth it 🙂
Multiply mode has advantage of reverting back to original drawing to fix mistakes with black and white. Changing a layer mode takes less time than hunting pixels down with selections (“select black” -> invert -> delete) or filters. Thresholdind/leveling is the key. Then again there’s many ways to do one task in Photoshop.
Another method is to follow your process right up to using the kill white plugin…and then my technique is as follows
1. select all
2. Create a new layer
3. Turn quick mask on
4. Paste into the new layer
5. Turn quickmask off
6. Invert selection
7. Fill line color
Works like a charm
Cheers
Thanks for sharing, Karen! Can I share/ reblog your blog?
Fine with me. Just make sure I’m cited and you link back to the source. 🙂
Reblogged this on m a . m o i . z e l l e and commented:
I’d like to share this special tutoral from Karen B. Jones about coloring a hand-drawn line drawing in Photoshop. I hope that you guys will enjoy!
Thanks!
Hi Karen, thank you so much for making this way back when. I’m trying to figure out how to color my hand-drawn line art digitally and only now realized I can do it with my old PSE software. I can’t wait for the day when I can afford to go fully digital, but this will do for now.
Thanks again, and I wish you great success in your art career.
— Chris
You’re welcome. Glad it helped you.
Elements is actually pretty good. It doesn’t have everything the full Photoshop has, but it has most of the useful bits. You should be able to get along with it almost indefinitely, which is good considering how expensive the full version is (or, even worse, a subscription!).
Coloring a hand-drawn image is all about the layers. I usually like to use a different layer for each color so I can fiddle with each exact hue and shade individually or as a group after I’ve put it down. Useful so you can easily tweak it for printing or whatever.
Good luck on your career as well. 🙂
Oh yeah, I love layers. I haven’t tried working with them in Elements yet, but I use them in my iPad app Tayasui Sketches when working on comic strips. Layers are an artist’s best friend!