PSD Repair App

logo-256I had a bit of trouble this morning opening a PSD file I’d worked on for hours yesterday.  It didn’t recognize the file type even though it was saved as a Photoshop Document (PSD) file on Photoshop.  Thought I was going to have to completely re-do several hours of work.  But, on a hunch, I searched the web for a way to recover the file.  There were suggestions on how to do it by going directly into the code and manually fixing something.  I’m not really comfortable working at that level.  But, luckily, I did find an App called PSD Repair.  Now, it’s not free, but it’s not too pricey either.  And they offer a trial which recovers your image (proof it works) with a watermark (to force you to pay for it).  Fair enough.  It did recover my file, which is worth $27 to me.  So, I paid it.

Now my file is recovered.

I do need to go in and redo the spacing on my font and make sure that all my layer effects came through correctly.  However, that should be much faster than starting from scratch, so I’m satisfied.  They also have an option to recover one file at a time online at $10 a pop.  That would also work, but I figured I’d spring for the download just in case it happens again.

So, anyway. I would like to recommend PSD Repair for anyone who needs their PSD files repaired. Seems to work, it’s not too pricey, and you can check if it works for your file before you buy.

Here’s the link:  https://www.psd.repair/#/

Lazy Nezumi Pro

I’d like to plug a Photoshop plug-in that I discovered a couple months ago and I think it’s absolutely wonderful. Lazy Nezumi Pro. What it primarily does is smooth your strokes for you, which eliminates the regrettable stair-step pixelated lines you sometimes get if you’re zoomed out too far when you draw or when your processor is being stupid. And it smooths out your wobbly curves. It lets you specify how much you want it to average out your strokes, so it’s totally adjustable for your preferences.

Another totally useful things it does is that it has a ton of different types of on-screen rulers to help you draw lines, curves, shapes in perspective, spirals, etc. The great thing about these rulers is that you can adjust the precision. So, when you want to draw almost-perfect shapes or lines, but not so perfect that it doesn’t look hand-drawn, this does that beautifully.

There are a bunch of other cool features as well that you absolutely should play with.

I bought it because my wonderful wacom cintiq had ANOTHER 3-in-1 cord fail on me. Seriously, wacom? Seriously?!? And it took TWO MONTHS for them to send me a replacement because they were out of stock. (If you have one of these, do yourself a favor and buy a spare cord to keep around, because they break ALL THE TIME and wacom can’t seem to keep them in stock. Especially if you’re out of the warranty period.)

So, my cintiq was out of commission for the entire second half of my recent Genie Loophole project. Luckily, I still had my old wacom intuos pro. It is a graphics tablet, but not a screen tablet like the cintiq. It takes a little longer to get the lines the way I like them on the intuos than on the cintiq. The two main problems are getting strokes to fall exactly where I want them and avoiding the stair-step thing on my lines.

Lazy Nezumi saved my skin. After some practice, I was able to use that in combination with my intuos and get results as good as, and almost as fast as, with my cintiq.

Anyway, go buy the thing. It’s worth the money. You will thank me for it.

Red Tulip

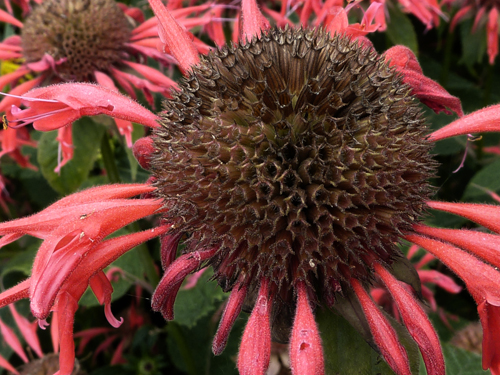
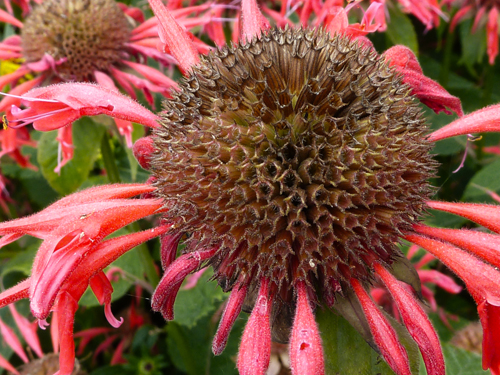
Red Tulip Macro
Okay, so this has been fiddled with, but not that much.  I masked out the blossom and upped the vibrance and saturation by 10 each.  Then I lowered the saturation for everything else by 40-something.

I really like the striation on the petals between the red and almost-beige parts.  I thought it was interesting.

It’s also not a standard tulip.  It’s some fancy breed with funny petals, but it’s still a tulip.

Jump Rope Animation

It’s just a simple little stick figure jumping rope, but it’s my first ever animation.  I made the frames in Illustrator and animated them in Photoshop.  It consists of ten frames at .05 seconds each, so a rate of 20 frames a second.  I figured out the timing by singing “Miss Mary Mac” at the tempo that goes with jumping rope and set the speed to match that. (Though it still might be just a bit too fast, I’m not sure.) It’s not very fancy, but I’m proud of it.  smiley 15

Jumprope-Animation

I may have overdone her bouncy hair a bit, though.

Tutorial: Better Way to Remove White (Without A Filter!)

Okay, as an illustrator, I frequently find myself needing to remove all white from a layer in Photoshop.  I’ve been doing this with a filter called Kill White which I talked about here.  But I always thought this was such an obvious need, why doesn’t Photoshop come with a tool that does this already?  Something in their filters or maybe in Image->Adjust?  But I’d never found it.

Now, of course, had I taken any formal Photoshop classes I might have learned the trick from a professor.  But as it is I learned Photoshop on-the-job, on my own, and from the occasional online tutorial.  So, although I’m well-versed in the day-to-day operation of Photoshop (and even many obscure things that it can do) I do have the odd hole in my skill set.

Well, a few weeks ago I filled one of these holes.  I found how you properly remove white from a layer.  Without any add-on filters.  I’m sorry I can’t cite my source.  I think I saw the explanation on tumblr.  But I’m really not sure where.  But whoever the mysterious educator was, you have my gratitude.

Anyhow, here’s what you do.  (And it’s stupid easy, btw.)  You know that CHANNELS tab you probably never use and have no idea what it does besides change your image funny colors when you hide one channel or another?  Well, it uses that.  If you don’t know what I’m talking about, go to the Window menu and go down to Channels.  Click that.

Now you see it?  Okay, good.  Remember where it is, but go over to layers tab for the moment.  Choose the layer you want to remove white from.  Make sure it isn’t the background layer.  If it is, copy or convert it to a regular layer.  Select that layer.

Now go back to channels.  All four channels are selected.  Leave that as it is.  Look at the bottom of the channel window.  There’s a line of symbols.  A dotted circle (Load channel as selection), square with a circle in the middle of it (Save selection as channel), rectangle with the corner folded over that means new (Create new channel), and the trash can (Delete selected channel).  So, that first symbol is the one that matters.  The load channel as selection.  With all four channels selected (as they were when you got there) click that dotted circle.

That automatically selects all the white in the layer.  Not just all the white, but if the pixel is 20% white and the rest some color, it is selecting that 20% white but not the 80% color.  Don’t ask me how it does that, just accept it.  So, now, while all the white in your image is selected, press your delete key.

Now click Select->Deselect.

And you’re done.  Your white is gone leaving only your lines.

Can’t see it?  Add a new layer under the one you were working with and fill it with white.  See it now?  Good.  🙂

One more fun thing.  If you wanted to tint or monochrome all the lines, this is a really good time.  Or if the lines seem too light to you after removing the white.  So, go reselect all the transparent stuff that used to be white before you deleted it.  Do this by clicking Select->Reselect.  Then click Select->Inverse.

Now all the stuff that is not white is selected.  And selected so that the 20% transparency on the pixel (previously 20% white) is not selected, only the colored 80% of that pixel.  So, if you want, just paint over that layer with a big brush of whatever darkish color you want.

Now, Select->Deselect.

There you go.

I guess I really should take the time to learn what else the Channels tool actually does, huh?

Photomanipulation: Butterfly on Flowers

I was playing with Photoshop today and photomanipulated this.  It should look like a realistic butterfly perched on a watercolor-ish flower cluster.  What do you think?

The butterfly is a Red Admiral (Vanessa atalanta).  I’m not sure what the flower is, but it’s one of those common landscaping flowers you see in planters and beds all over the place.  I took this photo at a mini-golf course last summer in Sister Bay, Wisconsin.

Buy a print or a card.

There is No “Create Art” Button in Photoshop!

A mother at my daughter’s school, after learning that I was an illustrator, commented something to the effect that she knows it’s so much easier for someone to make art now that there are programs like Photoshop out there to do it for you.  I informed her that, even with Photoshop, it still took work to create decent art and that there was no automatic “Create Art” button in Photoshop.  She reluctantly conceded that, but responded that she thought that it was only a matter of time until there really was.  I tried to explain why that wasn’t practical and wouldn’t happen, but she didn’t believe me.  Her faith in the possibilities of tomorrow’s technology was fierce, if simplistic.  It was a very strange conversation and I came away from it feeling vaguely insulted.

So, in case there is any doubt by anyone out there, I would like to say:

Digital art takes just as much talent as any other genre of art.  A digital painting is usually created by an artist using a stylus on a graphics tablet.  It’s very similar to using a pen and paper or a brush and canvas.  It’s just another medium, with its own techniques and challenges.  Although Photoshop does have some very cool, arty filters, there is no automatic feature to create art.  Good artwork, digital or not, takes work.  It always will.

Photoshop Tip: Text Along a Curved Line

Did you know that you can run your text along a curved line in Photoshop?  Just create a path (I’m not going into how to do that) and then switch to the text tool.  Move the curser over the line and it will change the way it looks.  Click and type and you’ll be typing along the line.  Neat, huh?

I learned about it here.