Not quite a real recipe, but here’s more-or-less what was done:
It was 6 or 7 small russet potatoes, sliced. About 1.5 or 2 cups of shredded cheddar cheese (You really can’t use too much cheese.) a quarter or a half a stick of butter (I don’t remember) cut into pats Maybe half a cup of milk chopped ham, maybe two cups worth a small bag of frozen broccoli, to make it “healthy” An onion, chopped. About half a small tub of sour cream A big handful of chives, cut up (green onions would work also)
Boil the sliced potatoes for about 10 minutes, drain them
Sauté the onion, crisp the ham
Heat up the frozen broccoli in the microwave.
Put everything except the sour cream and chives in a big casserole dish. Do it in layers like a lasagna so that you don’t get all the potatoes in one glob on the bottom.
Bake for 20 minutes at 400 degrees, covered.
Remove the cover and attempt to bake it for 10 minutes, but actually the husband forgot to start the timer when he helpfully removed the cover for you after the first timer went off so who knows how long it was in there, at least it didn’t burn.
Take it out and spoon about half a small tub of sour cream on top and dump the chives over that.
As mentioned earlier, I have a lot of frozen sour cherries in my freezer. And I mean a lot. They’re inherited from my late father-in-law who had a sour cherry tree. My go-to for excessive amounts of free fruit is to make pie out of them. So, here, for Thanksgiving, is my recipe for sour cherry pie.
This recipe uses instant tapioca because it’s absolutely magic. It works way better than flour as a thickener for acidic fruit. It’s a chemistry thing.
Note that the extracts are very nice, but optional. I currently have an overabundance of vanilla extract that I’m trying to use up. And almond extract is nice to use if you have it, but I wouldn’t expect you to make a special trip to the store if you have everything else.
Ingredients
1 cup sugar 1/4 cup instant tapioca 1 tbsp. lemon juice 1/4 tsp. almond extract (optional) 1/2 tsp. vanilla extract (optional) 4 cups thawed, well-drained, pitted sour cherries 1 double pie crust (I use one frozen and one refrigerated roll-out.) 1/4 cup or so of water 1 egg, beaten (optional) A little extra sugar for sprinkling on top (optional)
Instructions
Preheat oven to 400°F.
Pull out the pie crusts to warm up a bit on the counter.
Mix first 5 ingredients in large bowl. A pastry blender works well.
Add cherries and toss until coated.
Let mixture sit 10-15 minutes.
If your bottom pie crust isn’t already in a pie pan, do that now.
Place pie pan on cookie or jelly roll pan. The filling will probably bubble over when you bake it, so you might line pan with foil. This pan catches the mess.
Poke holes in bottom of bottom crust with fork.
Pre-bake the bottom crust for 4-5 minutes or so. This prevents a doughy bottom crust, but can make adhesion with the top crust difficult if baked too long. (Might adjust time based on type of pie pan.)
Fill crust with cherry mixture.
If needed, brush edge of crust with a little water to soften for better adhesion.
Position top crust and crimp edges with fork.
Trim excess crust. (Trimmed parts can be rolled out and cut into decorative shapes and stuck to top crust with a bit of water, if you want.)
Cut vent holes in top crust.
Optional: Brush top crust with egg. Sprinkle sugar over top crust.
Cover crust edges with foil or crust guard. Grease the crust guard to hopefully avoid sticking and then wish for the best.
Bake for 40 minutes.
Carefully remove crust guard and bake an additional 10 minutes. (If needed.)
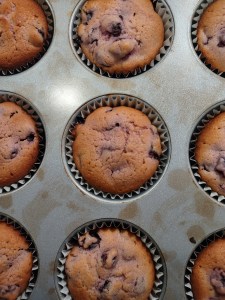
My father-in-law recently passed away. My mother-in-law proceeded him in 2021. With both of them now passed, my husband and his siblings are in the midst of settling the estate, cleaning out the house, and selling most of it. Among other things, I inherited a freezer full of frozen sour cherries. There were gallons and gallons of them going back to 2019. Gary had a sour cherry tree in his yard and dutifully collected, pitted, and froze as much of the harvest as he could manage. But, since Cheryl had died earlier, he was not able to keep up on using them in baked goods. Heaven knows what he planned to do with them all, but they’re all mine now.
I already had a sour cherry pie recipe that works really well. (I’ll post that later.) But I wanted something other than just pie to do with them. So, I searched for a sour cherry muffin recipe on the internet and the first one in the search results (outside of the sponsored results section) was posted by a blogger who looks like she’s a cookbook author. The recipe was highly rated, and I followed the directions dutifully. To the author’s credit, it did make muffins. I’ll give her that. Unfortunately, the muffin part, between the cherries, tasted like nothing so much as plain buttermilk pancakes. Very floury buttermilk pancakes. I mean, it was adequate. But I’m not sure why it was at the top of Google’s search results.
With all those cherries in my freezer, I needed to do better. After looking through some other recipes and trying two test batches of my own version, I have a new recipe. Mine uses butter, almond extract, and a quarter cup of reserved cherry juice to give that batter some flavor. I creamed the butter with the sugar because replacing canola oil with butter can cause baked goods not to rise as well. Creaming softened butter with the sugar helps mitigate that. I also bumped the baking powder way up. (After confirming with other recipes that using more should be okay.) My muffins don’t rise super high, but they aren’t nearly as dense as the original recipe. If you want them even fluffier, you might try adding even more baking powder until you’re happy with them. Be warned, though. I’m not actually sure what happens if one uses too much baking powder.
WHY BUTTERMILK? The acidity activates the baking powder. It’s a chemistry thing. The cherry juice might be enough on its own because it’s also acidic, but I’m not sure. The original recipe used buttermilk and I just stuck with that.
ELECTRIC MIXER: You will need an electric mixer to cream the butter. A simple hand mixer is sufficient. If you want to use a spoon instead of a mixer, you can skip the creaming step, but the muffins will come out denser. You can also substitute an equal amount of canola oil for the butter, which will make the mixture a little easier to stir by hand, and will rise better, but it will contribute less flavor.
VARIATION: If you want to make chocolate chunk sour cherry muffins, replace up to half the cherries with the same amount of semi-sweet chocolate baking chunks. Fold them in along with the cherries.
FANCY: The original recipe called for 2 Tbsp. of sanding sugar as an optional topping sprinkled on after the batter is spooned into the muffin cups and before you put it in the oven. My grocery store does not carry sanding sugar, so I did without. You can try that if you want.
Chocolate Cherry Muffins
Sour Cherry Muffins
Ingredients
3/4 cups reduced fat buttermilk 1/4 cup reserved cherry juice 1 large egg 1/2 tsp. almond extract 2/3 cup softened, salted butter 1 cup sugar 2 cups all-purpose flour 2 1/2 tsp. baking powder 2 cups sour cherries (pitted, thawed, very well-drained)
Instructions
Preheat oven to 350° F.
Line standard-sized cupcake/muffin pan with paper or foil liners. Recipe yields 18-20 muffins.
Mix wet ingredients (buttermilk, cherry juice, egg, almond extract) in a bowl.
Cream butter and sugar in a bowl. Use an electric mixer on medium speed for 1-2 minutes until well combined and sort of fluffy.
Combine wet ingredients into creamed butter and sugar mixture.
Slowly add remaining dry ingredients (flour and baking powder). Mix on medium speed until well incorporated.
Fold in cherries.
Spoon batter into muffin cups. Fill 3/4 full.
Bake for 30 minutes but check at 25 minutes just to be sure. Muffins will be done when top is beginning to turn golden brown and an inserted toothpick comes out clean of batter.
Let rest a few minutes. When cool enough to handle, transfer to a cooling rack.
3/4 cup sugar
3 tbsp minute tapioca
2 tbsp butter at room temp
4 cups fresh blackberries
Frozen Deep Dish Pie Crust (for bottom crust)
Refergerated pie dough (for top crust)
water
1 egg
1/2 cup sugar
Preheat oven to 400.
Combine sugar and tapioca w/ wisk.
Add butter and blend w/ wisk.
Add berries and mix with hands.
Let mixture set for 15 minutes.
While that sits, prebake frozen pie crust for 4-5 minutes. This prevents a doughy bottom crust, but can prevent good adhesion with the top crust if baked too long.
Fill pie crust with berry mixture.
Moisten edges of bottom crust until doughy again.
Cover with top crust.
Trim edges. Use fork to crimp edges.
Cut vent slits in top crust.
Whisk egg in bowl. Paint egg on top crust with pastry brush. Sprinkle with sugar.
Cover edges with aluminum foil or crust shield. Spray back side of shield with cooking oil to prevent sticking.
Bake for 45 minutes
If you make at least 2 pies, you’ll have enough crust trimmings to make turnovers, if you also have some extra berries and tapioca.
Do not ever make a blackberry pie using a recipe that calls for flour in the Blackberry mixture. It doesn’t work right. blackberries are too acidic and, for some reason, it prevents the flour from acting as a proper thickening agent. Instead, you just end up with floury glop. This is the voice of experience. Tapioca works much better.
1 frozen deep dish pie crust
1 refrigerated roll-out pie dough
½ cup sugar (1/3 to 2/3)
¼ cup all purpose flour
½ tsp cinnamon
dash salt
8 cups tart apples
1Tbsp butter
1 egg (beaten)
2 or 3 Tbsp cinnamon/sugar mixture
Thaw crusts.
Slice apples.
Mix sugar, flour, cinnamon & salt in large bowl.
Stir in apples.
Fill pie crust with apple mixture.
Dot with butter.
Cover top with roll-out pie crust.
Crimp and trim edges.
Cut slits for venting.
Brush crust with egg, then sprinkle with cinnamon/sugar mix.
Cover edge of piecrust with foil or pie crust shield to prevent overbrowning. Spraying back side of shield with cooking oil will help prevent sticking.
Bake at 425º for 40-50 minutes or until crust is brown & juice bubbles through slits. Remove foil during last 15 minutes.
Asparagus is delicious, but easy to overcook. It only just needs a few minutes and it’s done. More than that and you get a horrid, stringy vegetable mass that tastes a bit like canned green beans.
I recently ordered asparagus at a local Perkins restaurant. I don’t know what I was thinking. There was little chance they’d do it right and, in fact, they didn’t. So very disappointed, but I didn’t think the cook had any idea. Perhaps I should have complained. Would it have made any difference? Would it have gotten back to the cook and educated him on the proper way to cook this vegetable? Probably not. *sigh*
I’ve overcooked asparagus myself before. Several times, in fact. I always feel bad when I do because it can be such a lovely dish when done properly. I wonder how many people don’t know how to cook it and think that the overcooked version is what it’s supposed to taste like.
My favorite, and most successful, recipe for Asparagus is below. You can tell it’s good because it starts with bacon.
Sauteed Asparagus with Onions, Peppers and Bacon in Cider Vinegar
5 or 6 strips of bacon, cut into one inch pieces
One Medium Onion, sliced
One Sweet Bell Pepper, chopped into one inch pieces (Red, Yellow or Orange is best, but Green is acceptable)
One bunch of Asparagus, chopped into one inch pieces
Some Cider Vinegar (Maybe 4 tablespoons or so)
Note: Make sure you snap off the woody end of the asparagus stalk and discard. You don’t eat this part of the stalk.
In a Medium-Hot frying pan, cook the bacon. Do not drain.
Add Onions and cook until just soft.
Reduce heat to Medium.
Add Cider Vinegar. Use your discretion on how much. A couple splashes, is how I’d define it.
Add Peppers and cook for a minute or three until they start to get a bit soft.
Add Asparagus and cook for 3 or 4 minutes. Every minute or so, take a piece out and taste it so you can be sure not to overcook it. It should still be crispy, but warmed through and not raw.
Take off heat and transfer to a large bowl to serve. The dish cools quickly, so be sure to cover if you won’t be serving immediately. I like to use the Warm Hold setting on my microwave for this.


 3/4 cup sugar
